-
Friday, January 21, 2011
Tutorial: Tiny Playing Card Book
This little book is made from a single playing card, regular recycled copy paper and a strip of paper cut from a Netflix envelope.
How-To:
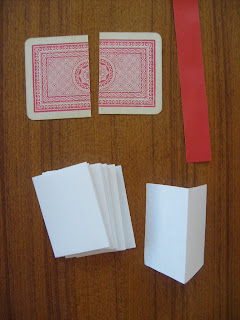
Cut a stack of pages slightly smaller than the card you will use for the cover. Cut a strip of paper to cover the spine approx. 1/2 inch (just shy of 2cm). For over sized cards make the strip a bit wider. Cut the strip much longer than it needs to be. You will trim it later.
Cut the playing in half. Try to be as exact as possible. Fold each piece of paper in half to make a folded leaf.
Stack the pages and the covers together with the folded edges of the leafs facing to the outside of the cover. Anchor together with a binder clip. Carefully dip the spine edge in a line of ordinary white liquid school glue. Wipe off any glue that gets unto the front or back faces of the cover.
Add two more binder clips to hold the book together as it dries. You may wish to dip the spine in glue again after the first layer dries to insure a really secure bond.
When the glued spine is completely dry, use stick glue to glue the paper cover to the spine.
Trim the extra paper from either end of the spine. Before the stick glue has dried, run you finger nail along the face of the spine to adhere it to the page ends and insure a flat spine once the stick glue has dried.
Subscribe to:
Post Comments (Atom)


No comments:
Post a Comment
Note: Only a member of this blog may post a comment.